GA4 is great in so many ways (and not so great or misunderstood in others), but one of the differences from Universal Analytics which can be incredibly frustrating is this: There are no individual metrics for the different Conversions you enable. There is one metric called “Conversions” and then these can be differentiated with the Event Name dimension. By contrast, in Universal Analytics, every Goal you set up has its own metric: “Goal 1 completions”, “Goal 2 completions”, etc.
GA4 report building challenges
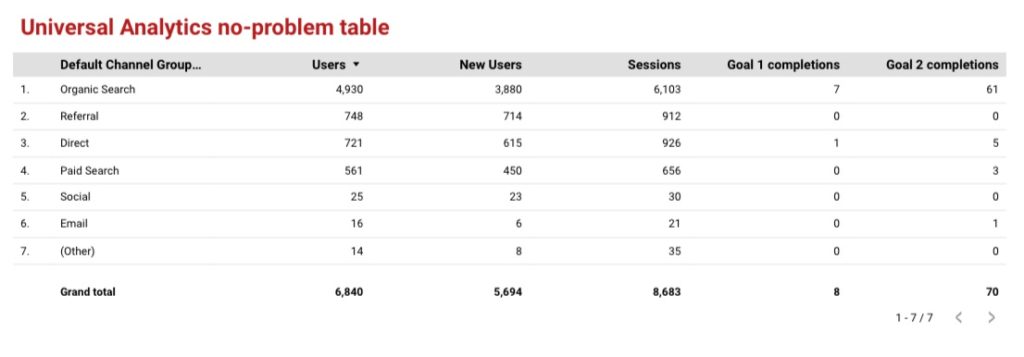
This structure creates a significant challenge when building reports in GA4 (and let’s face it, GA4 doesn’t have many pre-built reports, so this is actually a major thing!). Specifically, you cannot build a report where you can include other metrics, like Total Users and Sessions against a specific conversion like “Contact Us Submission”. Take the table below built in Data Studio using Universal Analytics data. We are able to use metrics like Sessions and Users alongside different Goal metrics.
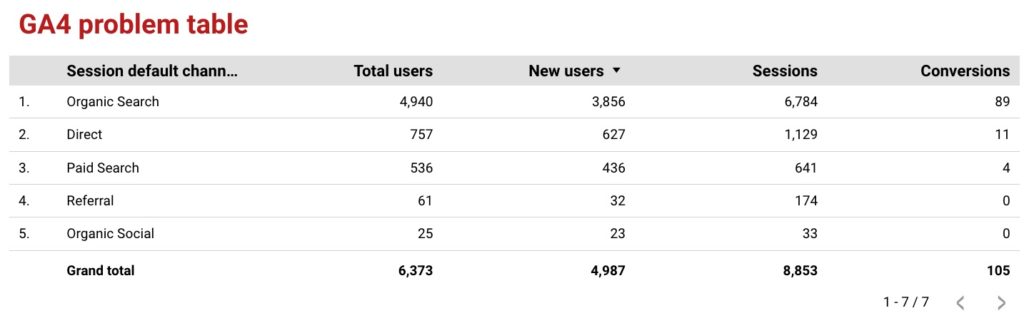
If you try to achieve this report using GA4 data, you can’t do it because there are no individual metrics for each Conversion. You only have the Conversions metric, which is an aggregate of all your different enabled conversion events, so it looks like this:
In terms of user expectations, I suspect most users would not expect this to be the case when they configure a Conversion. They would expect to be able to report on each conversion individually, against all the other metrics because they want the context around the conversion performance. And don’t think filtering to the Conversion name is going to help. If you do that, it will simply filter all the other metrics to users, sessions, etc that completed that conversion.
A couple of caveats to this challenge
You won’t necessarily need to implement this in all cases. In some cases, the event you enabled as a conversion might also available by default as a separate metric. This is particularly true for ecommerce events. For example the following events have corresponding metrics that you can use:
| Event name | Corresponding metric |
| add_to_cart | Add-to-carts |
| begin_checkout | Checkouts |
| purchase | Transactions |
| first_visit | New users |
| view_item | Item views |
| first_open | First opens |
Now, if we’re going to split hairs, you could potentially also achieve the intended report in Data Studio by using data blending, but:
- This is a lot of work, fiddly, and requires understanding of how Data Studio’s data joining works to avoid mistakes.
- Sometimes, even data blending can’t produce the results you want.
- Using data blending means additional processing by Data Studio which will slow your reports down a bit.
- There is no data blending option in the GA4 Explorations interface, if this is where you wanted to build your report.
If you really need the reporting on historical data, then data blending is one of your few options. However, this post isn’t about data-blending, it’s about a configuration that you should implement ASAP to give you the reporting capability you need moving forwards.
Solution using Custom Metrics
The solution is to create a custom metric for your conversion action. There are a couple of steps to this:
- Enable a new parameter in your tracking which will count the specific Conversion.
- Register that parameter as a custom metric.
Enable a new parameter in your tracking
The first thing to do is enable a new parameter in your tracking which will count the number of times your conversion occurs. There are a couple of ways you can do this:
A) Add the parameter in your code that sends the event for your conversion and give it a value of “1”.
While this is a perfectly valid option, it’s not the fastest approach. Also, if you are tracking web and app events in your GA4 property, you’d have to modify the tracking for each platform that sends this event to get your final metric counting correctly.
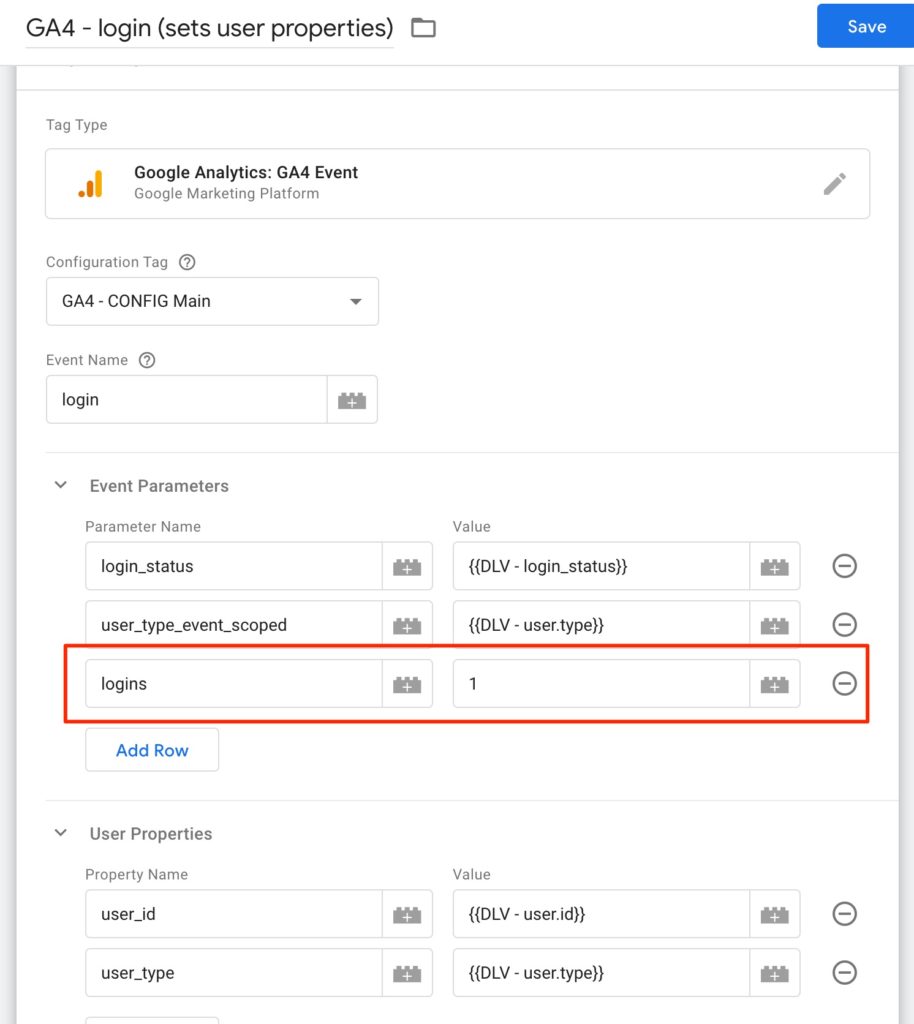
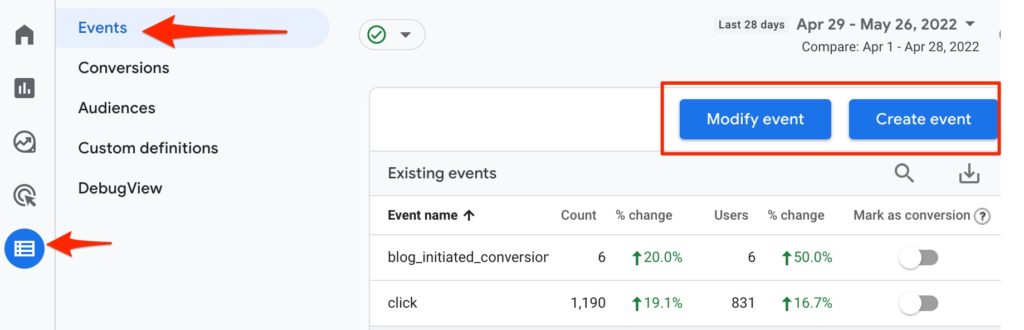
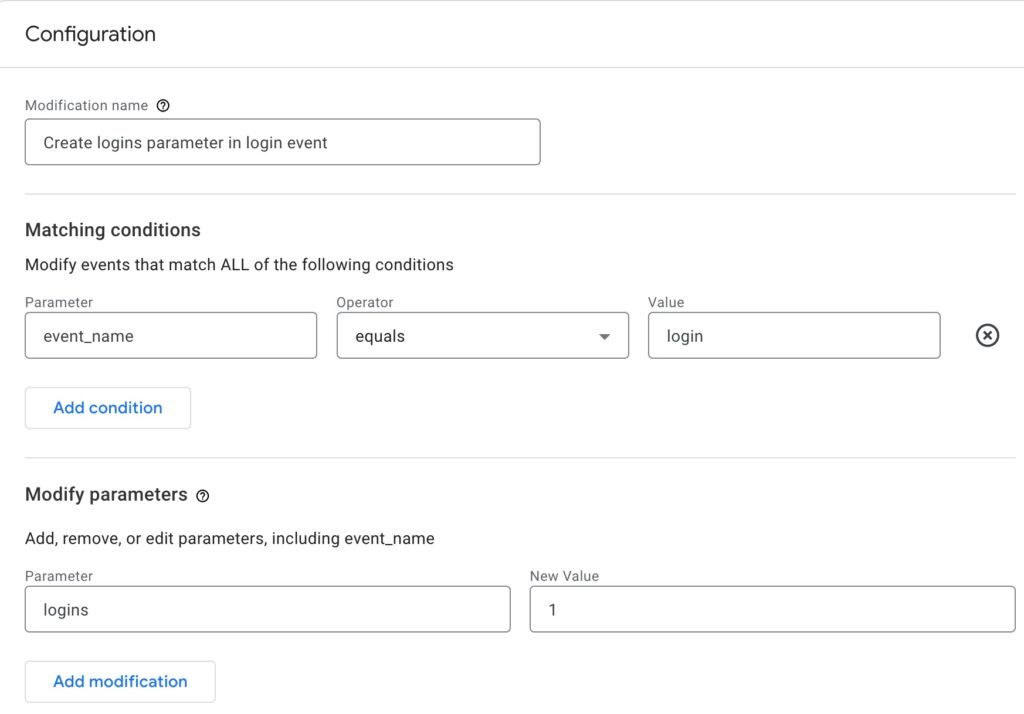
B) RECOMMENDED – Use the Modify Event feature in GA4 to add a parameter for the custom metric, giving it a value of 1 (or simply add the parameter in your Create Event settings if this is how your event gets created). You can find this feature in the Configure section in the Events tab.
The configuration for your event modification would then look something like this. This configuration means that when you have an event called “login” add an additional parameter called “logins” and give it a value of 1 for every time the event occurs. Remember that if your parameter has more then one word, you’ll need to use snake_case for it to be valid.
Register your custom metric
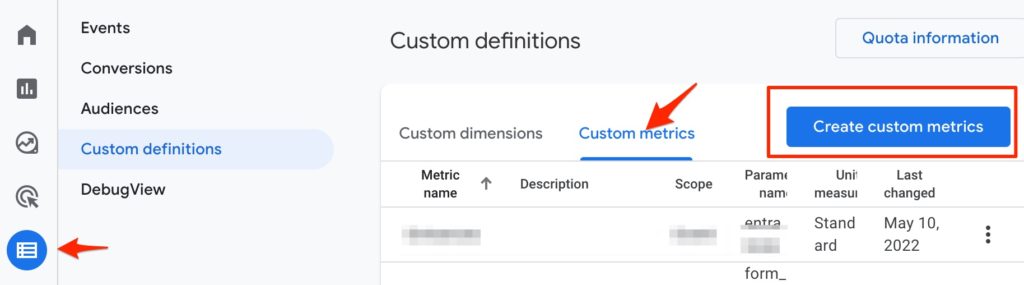
Sadly, the creation of the parameter itself does not mean the new data you are sending gets stored. You also need to create a custom metric in the GA4 interface. You can do this in the Custom Definitions tab in the Configure section:
In the configuration section, give your custom metric a name and map it to the parameter name you created. It’s essential that the event parameter name matches parameter name you created in the previous steps, but you can use whatever you want in the “Metric name” field.
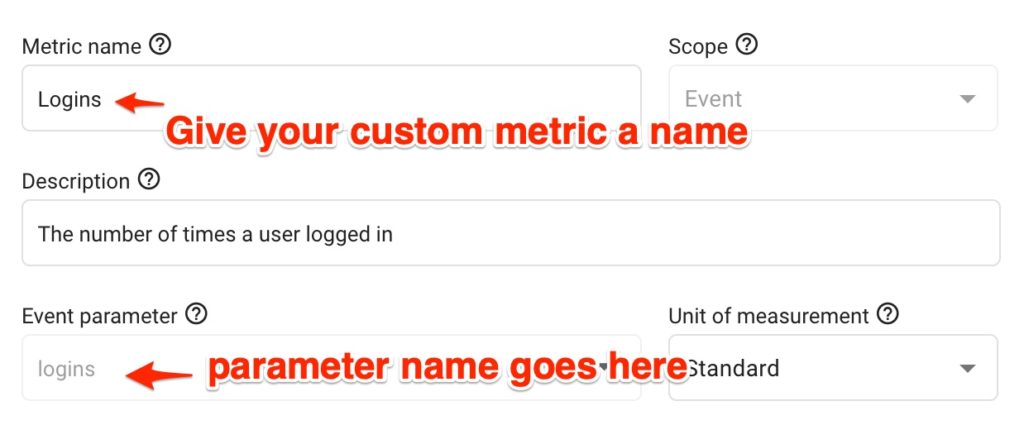
Note that the scope is “Event” as opposed to “Session”, “User” or “Item” scoped. Google says adding these into GA4 is on the roadmap and it will great to have that at some point (the sooner the better, if you’re reading, Google).
TIP – If you look at the naming convention GA4 generally uses, the metric names are always plural, whilst the dimensions are always singular, so always use a plural when you are creating parameter names and custom metric names based on event counts. Your metric name doesn’t need to use snake_case, you can use spaces and other characters, but I’d recommend aligning with GA4’s naming convention where the first letter of the first word is uppercase but everything else is lowercase
Using your GA4 custom metric in reports
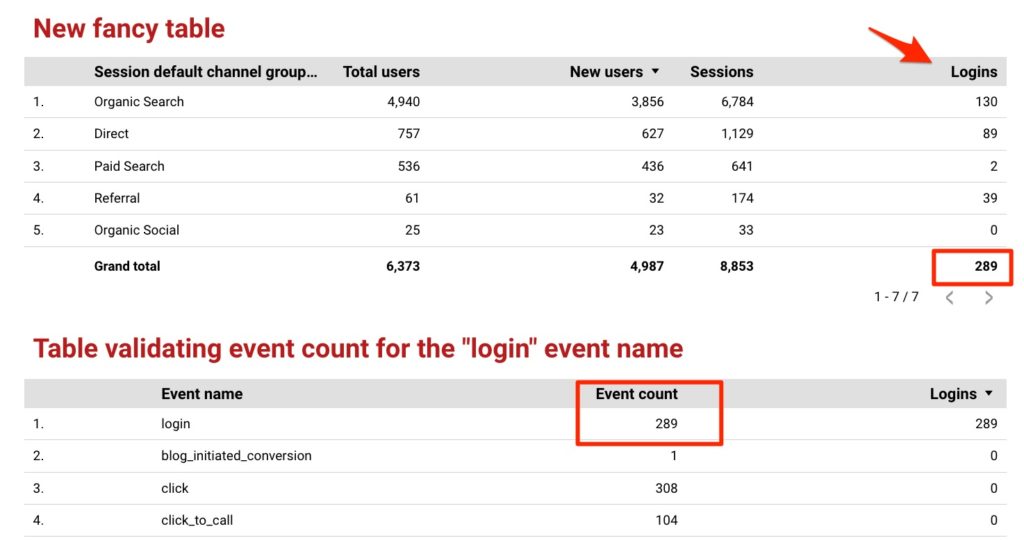
Once you have implemented this and collected some data, you’ll have a new metric available that you can use in your reports.
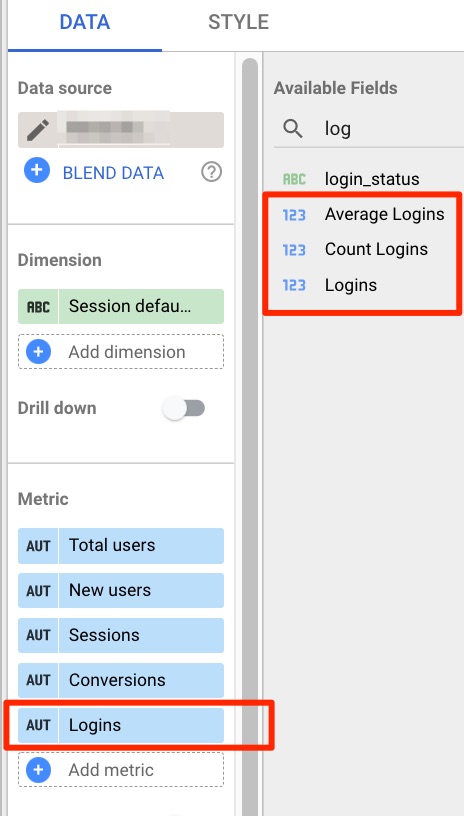
You can then place it/them alongside other metrics so that you get more context around performance.
So there you have it. Resolving your frustrations around reporting on specific conversions with the context of other metrics
Final thoughts and comments
While, I’ve mentioned created Custom Metrics for Conversions, you can actually use this method for any event. It doesn’t have to be a Conversion. There is a quota of 50 event modifications and 50 custom metrics for you to use, so there is not much need to hold back in creating these!
It’s important to understand that this method does give you an event-scoped metric, unlike Universal Analytics goals which are session-scoped. As a result, if you want a session-scoped or user-scoped metric for the Conversion, you can try data blending in Data Studio or you can wait until those scopes are available in GA4. While Google says they are on the roadmap, we have no timeline around this. Could be next week. Could be in three years time.
As mentioned, this method will only apply to data from the time it is configured onwards. It won’t work if you set this up in order to report on historical data. However, this should be your cue to get onto it now.
I hope you find this post helpful.